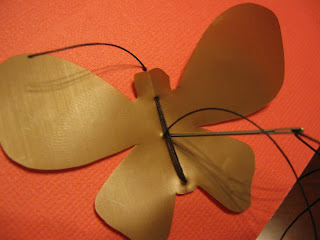
Today I'm going to show you how to make some cute, easy stationary that serves equally well as a thank you note, birthday card, invitation, or just a note. You will need colored cards for decorating. Mine are from Michael's. There are plenty of similar products to choose from; I like these because they came in a variety pack of colors. You also need some kind of thick plastic. I used a bronze plastic boutique bag, but last time I used an Anne Taylor bag- stiffish frosted clear plastic. It was precious. You also need a needle and thread; I used a big embroidery needle and brown upholstery thread. The only reason I used thick upholstery thread is because I purchased it accidentally once and I have this entire spool to use up.

Also you need coffee. Always.
First, you cut butterfly shapes out of the plastic. They're about an inch and a half tall. I cut them out by folding the plastic in half first and cutting a half silhouette to keep them symmetrical.
Next, you actually sew the butterfly onto the card. This is super easy to do.
1. Hold the butterfly in place and insert the needle at the "head"; pull it through to the back so that you leave a little piece sticking out to be an antennae.

2. Stick the needle back through the butterfly's "butt" OUCH.

3. Stick the needle through the butterfly's "neck" to form the body, as shown. Repeat steps 2 and 3 to make a thicker body.

4. If you want, you can do a quick stitch in the center of the body to make it segmented like a real insect body. Push the needle up in the center of the body, loop around the body, then go back down through the same hole you entered.

5. Push the needle back up at the head.

6. Tie the two ends in a double knot at the head and trim to make antenna.

How cute.

You can make lots of them. Even after mailing the butterflies keep some motion. I made a flower, too, using triple layers of petals.


